CAR SEAT INFORMATION: https://www.healthychildren.or...
- FOR ADDITIONAL CAR SEAT/BOOSTER SEAT INFORMATION VISIT www.safekids.org
- PRODUCT RECALLS: https://www.safekids.org/produ...
- NEED HELP INSTALLING YOUR CHILD'S CAR SEAT? CHECK HERE: www.safekids.org and look for a CERTIFIED technician
SAFE KIDS WORLDWIDE INFORMATION: more information found at safekids.org
73% OF CAR SEATS ARE NOT USED OR INSTALLED PROPERLY! DOUBLE AND TRIPLE CHECK YOUR SEATS!
Choose the Right Direction: Rear- or Forward-Facing •
For the best protection, keep your baby in a rear-facing car seat until at least 2 years old or more. You can find the exact height and weight limit on the side or back of your car seat. Kids who ride in rear-facing seats have the best protection for the head, neck and spine. It is especially important for rear-facing children to ride in a back seat away from the airbag. • When your children outgrow a rear-facing seat and are at least over age 2, move them to a forward-facing car seat. Keep the seat in the back and make sure to attach the top tether after you tighten and lock the seat belt or lower anchors (LATCH). Use the top tether at all times. Top tethers greatly reduce your car seat’s forward motion in a crash. • Kids can remain in some forward-facing car seats until they’re 65 pounds or more depending on the car seat limits. Check labels to find the exact measurements for your seat. Discontinue use of lower attachment when your child reaches the limits set by your car seat and car manufacturers. Continue to use the top tether. You must read both manuals to know about those limits. Not to worry: Once your child meets the lower anchor weight limits, you will switch to a seat belt. Seat belts are designed and tested to protect all adults as well as children in car seats and booster seats.
Make Sure Your Car Seat is Installed Correctly
Check Your Car Seat • Seventy-three percent of car seats are not used or installed correctly, so before you hit the road, check your car seat. Here’s a quick car seat checklist to help you out. It takes only 15 minutes. • Learn how to install your car seat for free. Safe Kids hosts car seat inspection events across the country where certified technicians can help make sure your car seat is properly installed. They also serve in fixed locations called inspection stations during specific days and times in some communities. You may find an inspection station with certified technicians at a dealership, a hospital or even a fire house. They will teach you so that you can always be sure your car seat is used correctly. Find a Safe Kids car seat checkup event where we use only certified technicians, near you.
Is it Time for a Booster Seat? • Take the next step to a booster seat when you answer “yes” to any of these questions:
• Does your child exceed the forward-facing car seat’s height or weight limits?
• Are your child’s shoulders above the forward-facing car seat’s top harness slots?
• Are the tops of your child’s ears above the top of the car seat?
• If the forward-facing car seat with a harness still fits, and your child is within the weight or height limits, continue to use it until it is outgrown. It provides more protection than a booster seat or seat belt for a small child.
CAR SEAT SAFETY TIPS
 The best way to keep your child safe in the car is to use the right car seat in the right way. Here are some car seat safety tips to protect your most precious cargo.
Hard Facts about Safety in Cars
- Road injuries are the second leading cause of preventable deaths and injuries to children in the United States.
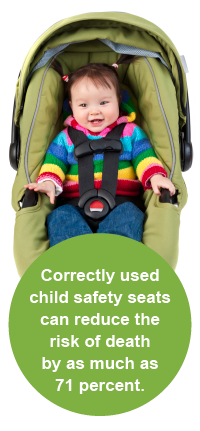
- Correctly used child safety seats can reduce the risk of death by as much as 71 percent.
- More than half of car seats are not used or installed correctly.
Top Tips about Car Seat Safety
- Buying the right car seat. Your baby needs to ride in a rear-facing car seat as long as possible until 2 or more years. When your child has outgrown that seat, you are ready for a forward-facing car seat. Get more details about buying the right car seat for your child.
- Installing your car seat. You’ll need to decide on using either the seat belt or lower anchors to secure your car seat. Both are safe, but don’t use them both at the same time. Once your child is forward facing, it is important to use the tether with the seat belt or lower anchors. Get more details about installing your car seat.
- Getting the right fit. A properly-fitted harness gives the best possible protection for your child. Here are more details about getting the right fit for your child.
- When to change your car seat. Look on the car seat label to make sure your child is still within the weight, height and age limits for that seat. Get details about when to change your car seat.
Learn More
Many kids spend a lot of time in the car, so it is important to learn how to keep them safe on the road. There’s a lot to know! Learn more car seat safety tips to protect your child.


PASSENGER SAFETY FOR BABIES
 Car Seats
Your baby is going places. Here are tips on how to get there safely in the right car seat. The most important tip: Keep your child rear facing for as long as possible. Stay rear facing until your child has outgrown the car seat by weight or height. Many children will be able to take advantage of this safer ride beyond age 2 or even 3.
Types of Rear-Facing Car Seats
There are three types of rear-facing car seats.
- Rear-Facing Only Seat. People often buy this type of seat because it is portable. Most, but not all, can be used in strollers that are sold with the car seat or those recommended by the manufacturer. Caregivers can also purchase extra bases for the car seat so that it can be used in several cars.
- Convertible Car Seat. This seat is larger and stays in the car. It can be used rear facing until your child is 2 years or more. After that, it can change to a forward-facing seat. It generally has higher weight or height limits, so it will last longer than the rear-facing only seat.
- 3-in-1 car seat. This seat also stays in the car. You can use it rear facing, forward facing, and then later, as a booster seat.
Installing Rear-Facing Car Seats
- Install your rear-facing car seat in a back seat. You can use either a locked seat belt or lower anchor attachments. Either works, but don’t use both at the same time. This video will show you how to install your rear-facing car seat.
- Check the car seat’s angle indicator. (It is on the seat.) Make sure the recline angle is correct. The recline angle is critical for infants who can’t yet lift their heads to breathe. Check the car seat manual and labels for more help.
- Get a snug fit. Make sure the car seat is snug enough to pass the Inch Test. A properly-installed car seat should not move more than one inch side to side or front to back when pulled at the car seat’s belt path near the baby’s feet, not near the head. Check out the Inch Test video.
Four Steps to the Right Fit for Baby’s Car Seat
- Place your baby in the seat. Your baby’s back and bottom should be flat against the car seat. Do not put anything behind or underneath them, such as a blanket or pillow.
- Check the harness straps. Make sure that the harness straps come through the car seat’s slots at or just below your baby’s shoulders.
- Buckle and tighten the harness so it is snug. Do the Pinch Test to make sure you cannot pinch the harness strap at your baby’s shoulders. You will need to loosen and tighten the harness each time you put your child in the car seat to get a snug fit. Check out the Pinch Test video.
- Position the chest clip. It needs to be level with your baby’s armpits.
When to Change to the Next Car Seat
- Don’t be in a hurry! The safest car seat for children is a rear-facing one. Riding in a rear-facing car seat will help protect your child’s head, neck and spine in a crash. You may have to move your child from a smaller rear-facing-only car seat to a bigger convertible car seat or a 3-in-1 car seat installed in the rear-facing position.
- Check the label. Your child will be ready for a larger, rear-facing car seat when she passes the weight or height limit on the car seat label or when her head is within one inch of the top of the car seat.
- Long legs? Older children with longer legs can stay in a rear-facing car seat and comfortably cross their legs. All children, even those with special healthcare needs, follow the same rules for staying safe in the car.
PASSENGER SAFETY FOR LITTLE KIDS
 Ready for a Forward-Facing Car Seat?
- When forward facing is safe. You are ready for a forward-facing car seat after your little passenger is age 2 or more and has outgrown the height or weight limits on the rear-facing car seat.
Types of Forward-Facing Car Seats
- Convertible car seat. This type of seat can be used in a rear-facing position first, and then turned to face forward when your child is big enough, after age 2 or more. If you have one of these seats, you do not need to buy a new car seat until your child is ready for a belt positioning booster seat.
- Forward-facing-only car seat. This type seat is used in only one direction and has a 5-point harness and top tether.
- Combination seat. This is a forward-facing seat with a 5-point harness and top tether, and can change into a booster seat when you remove the harness.
- 3-in-1 car seat. This can be used first in a rear-facing position, next in a forward-facing position and finally as a booster seat. Carefully read the labels if you decide to use a combination seat or a 3-in-1 car seat. The labels will tell you when to remove the harness and switch to a booster seat.
Installing Your Forward-Facing Car Seat
- Seat belt or LATCH. Install your forward-facing car seat in a back seat using one of two systems: either a top tether and locked seat belt or a top tether with lower attachments (LATCH). Both systems are safe, but don’t use both at the same time.
- The important tether. All forward-facing car seats must be installed using a top tether. The top tether reduces the forward motion of the car seat in a crash. Your car’s owner manual will tell you exactly where the anchor is in your car. There are usually three to pick from. It could be on the back of or under the seat in an SUV, on the shelf behind the headrest or even on the ceiling. Look for a top tether anchor in your car before you select the location for your car seat.
- LATCH- Check the position. Your vehicle owner’s manual shows the approved LATCH seating positions in your car. Not all seating positions have lower anchors, but they all have seat belts. Once you find the lower anchors, the tether anchor will be right there!
- LATCH – Check weight limits. When the weight of your car seat plus the weight of your child equals 65 pounds, you need to stop using LATCH and switch to using a seat belt with the tether.
- Get a snug fit. Make sure the car seat is snug enough to pass the Inch Test. A properly installed car seat should not move more than one inch side to side or front to back when pulled at the car seat’s belt path.
Four Steps to the Right Fit
- Place your child in the seat. Your child’s back and bottom should be flat against the car seat. Do not put anything behind or underneath them, such as a blanket or small pillow.
- Check the harness straps. Make sure that the harness straps come through the car seat’s slots at or above your child’s shoulders.
- Buckle and tighten the harness so it is snug. Do the Pinch Test to make sure you cannot pinch the harness strap at your child’s shoulders. You will need to loosen and tighten the harness each time you put your child in the car seat to get a snug fit. Check out the Pinch Test video.
- Position the chest clip. It needs to be level with your child’s armpits.
Tips for Moving to a Booster Seat
- Don’t be in a rush. Your child is safer in a forward-facing car seat with a harness and top tether, so wait until your child reaches the weight or height limit of the car seat before moving her into a booster seat. When you keep your child forward facing in a harness, there is more protection than using a booster seat with lap and shoulder belt or a seat belt alone.
- When it is time. Once your child outgrows the harness of a forward-facing convertible car seat, forward-facing-only car seat, or combination car seat, it’s time to move to a booster seat. Check out the video.
- Combination seat? If you are using a combination car seat or a 3-in-1 car seat, there’s no need for a new seat. Just follow the seat directions for changing the seat into a booster.
BOOSTER SEATS
 Big kids use belt positioning booster seats (often just called boosters) to stay safe in cars. Even though they might try to convince you otherwise, kids who have outgrown their car seats are just not ready for a seat belt alone. Here are a few tips to make sure your child is safe in a booster seat.
Hard Facts about Safety in Cars
Children seated in a booster seat in the back seat of the car are 45% less likely to be injured in a crash than children using a seat belt alone.
Top Tips for Using Booster Seats
- A booster seat provides a step between a car seat with a harness and a seat belt alone. It enables a safer and more comfortable fit of the adult seat belt.
- Make sure your child has outgrown the weight or height limits allowed in the forward-facing car seat. They must also be mature enough to ride without a harness. What does “mature enough” mean? They need to stay in the booster seat the entire ride with the seat belt properly fitted across the shoulder and below the hips.
- When your child is seated in the booster seat, make sure the lap and shoulder belts fit. The seat belt must lie flat across your child’s chest, on the bony part of the shoulder and low on the hips or upper thighs.
- Do not place the shoulder belt under the child’s arm or behind the child’s back.
- Older kids get weighed and measured less often than babies, so check your child’s growth a few times a year. For most kids, they will be between ages 8 to 12 years old before they are ready for the seat belt alone.
- Be sure you ask about booster use if your child is in a carpool.
READY FOR A SEAT BELT?
• Use a booster seat with the vehicle lap and shoulder seat belt until yourchild passes the following Seat Belt Fit Test:
• Your children’s knees should bend at the edge of the vehicle seat when their backs and bottoms are against the vehicle seat back; and
• The vehicle lap belt should fit across the upper thighs, NOT ON THE ABDOMEN and
• The shoulder belt should fit across the shoulder and chest, NOT on their neck or off the shoulder
AND your child can stay in this position even on longer trips for the entire car rids.
Children are usually between 8 – 12 years old when the seat belt fits them properly
Learn More
Learn more about booster seats safety tips.